Site Map
Home Page
Process Engineer
Chart Digitizer
Topic Editor
Video Timer
Photo Music
PLC Simulator
Android Timer
Alien Vision
Feedback
About GTS

Video Timer
Product Overview
Download
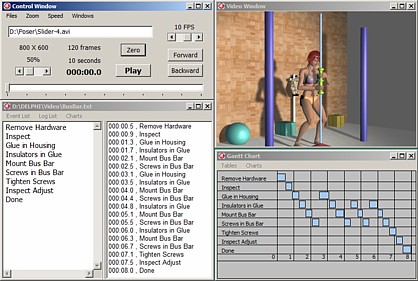
* * * * * * * Video Timer * * * * * * *
Copyright 2014 Ghost Town Software
This program allows the user to easily time a sequence of events in a video. Just list the events then click the name when the event appears in your video. The time stamps are logged automatically, while charts and tables are ready at the click of a button.
Create a list of events that you want to time in the video. The list can be created before and edited while the video plays. Then display your video - slow, fast, forward, backward. You can also time external events without a video.
Mark the timestamps of the events by simply clicking on the list when the event happens in the video. The timestamps are displayed in a list while the video continues to play.
Analyze the timestamps by viewing delta tables, charts and summary of the data.
Save and reload the event and timestamp lists for repeated use. The timestamp list and delta tables are saved in comma delimited format for additional processing in a spreadsheet.
Anomalies: MOD & MOV videos will need the file extension changed to MPG. Because of the weak video controller that this program uses, some of the video functions won't work with MPG type videos. The Forward/Back buttons, and displaying the first frame and random frames don't seem to work. The Play button and timer functions will work correctly with all videos.
* * * * * * The Video * * * * * *

* * Loading a Video:
This video viewer has a few extra features to help make tracking and logging events easier.
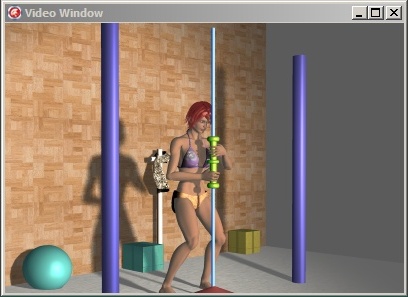
Type the file name of a video on the File Name EditLine, then click Load This File, on the menu. The video will display in the second window. This is a quick way to load a sequence of videos.
If you are unsure of the file name, click Browse Files, on the menu. Browse the file system to find your video in the dialog box. Then doubleclick the file name and the video will display in the second window.
This viewer has only been tested on these kinds of videos:
*.AVI *.WMV *.MPG
If .MOD or .MOV won't load, change the name to .MPG
When a video loads, the size, number of frames, and length in seconds is displayed.
The Zoom function on the Menu will resize the video between 25% and 300% of native size. This will allow you to fit the video to your screen size better. If you need to see a small portion of a big video in detail, zoom in and drag that portion of the image into the window.
* * Viewing the Video:
Click the Play Button and the video will play normally, at its designed speed. Click it again to Stop the playback.
While it is playing, the counter displays the time stamp in
MMM:SS.D = minutes:seconds.tenths
To play the video slower, select a frame rate from the menu then click the Forward or Backward Buttons. The video will run at that speed. To stop the video, click either the Forward or Backward button. (note that the Forward and Backward functions don't seem to work with MPG type videos)
Click the Zero Button to stop the video and reset it back to the beginning, whether it was running via the Play, Forward, Backward, or the slider.
When the video is running from the Play, Forward or Backward button, the progress is displayed on the Progress Bar, and on the Min:Sec Counter. If you move the Progress Bar the video will track the Progress Bar.
* * * * * * The Event Logger * * * * * *
The heart of this program is the video and the list of events that you are looking for in the video. When you see the event in the video, click on the event in the list, and the timestamp of the video is logged to the log listing.
* * Creating a List of Events:
The Event Window is displayed under the main window each time the program is opened. If it is not open it can be reopened by clicking Event List on the Windows menu of the main window.
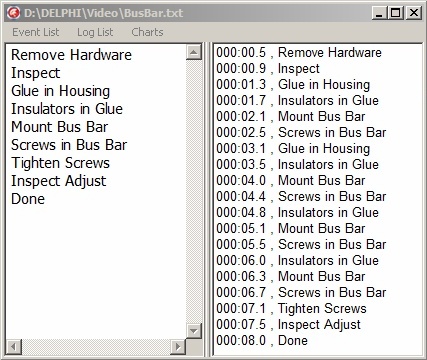
The Event Listing is the left panel of the Event Window. This panel is a free format text editor where you can create and edit your listing by simply typing the name of each event in the panel. List the names in the order that they will likely appear in the video, with one name per line. Do not use commas in the event names.
This listing can be added to and edited at any time, before or during the playing of the video. But note that if you change an event name, it will not correct the names that are already in the log listing.
* * Clearing the List of Events:
To clear a list of events, either highlight any or all of the events with the mouse then click the Delete key. Or click Clear-Event-List from the Event menu. That will popup a message box to confirm the delete before doing the delete.
* * Saving the List of Events:
You can save your Event Listing at any time by clicking Save List from the Event List menu, in the Event Window. This will popup a dialog where you can select a location.
* * Loading a Previous List:
To reload a previously saved Event Listing click Load List from the Event List menu, in the Event Window. This will popup a dialog where you can select a location. If this finds a csv file with the same name it will load it into the Log List Panel.
Note that the event listing is a plain text file with the extension TXT. This file can be created or edited with any text editor without any problems.
* * Timing the List of Events:
You can time events any time the Counter is counting, either with or without a video. This includes clicking the Play, Forward, or Backward buttons, and even if the video is stopped.
The Event List is initially in Edit Mode, to begin timing events the Event List must be Enabled: Click Enable List from the Event List menu. This will checkmark the Enable List menu item and the mouse pointer will turn into a pointing hand when it is over the Event Listing.
During this mode, anytime you click on an event in the listing, that event and the current time stamp will be copied to the Log List in the right panel. Click the Enable item again to remove the checkmark when you are done logging, to prevent accidents.
Events can be clicked in any order and as often as needed. The video can be stopped and continued or even restarted the next day, and the event logger will copy the correct time stamp from the video to the Log List. (Note that the timer can't be continued in No-Video mode.)
Time Stamps will be logged into the Log List in numeric order according to their time stamps. This way, missing events will be inserted in the correct position if logged later.
* * Timing events without a video:
Events can be timed either with or without a video. On the Files menu, the item Time-With-Video is not checked. This allows you to use the Play button to run the timer without a video, and the Event Logging functions will track the timer normally.
This is the default operation before a video is loaded. When a video is loaded that menu item will be checked and the timer and log functions will be sync'd to the video.
If a video is loaded, you can uncheck the menu item yourself. The Play button, timer and logging will then ignore the video.
Note that the counter will count off seconds, but the timestamps will log in tenths of seconds.
* * * * * * Reading the Time Stamps Log * * * * * *
The Time Stamp Log Listing is in the right panel. These are the time stamps that were generated when the Events were clicked on. This panel is a List Box, and not a text editor, it can not be edited directly.
Time stamps are in this format:
MMM:SS.D , Event Name
Where MMM = 000-999 minutes, SS = 00-59 seconds and D = tenths of seconds.
This format causes the listing to always be sorted numerically according to the time stamps, even if the events were logged out of order. The comma allows the two column listing to be popped into a spreadsheet.
* * Changing Time Stamps in the Log:
To change the time stamp for a log entry, click Enable-Log from the Log menu. This will checkmark the Enable-Log item and turn the mouse pointer into a pointing hand when it is over the Log Panel.
During this mode, anytime you click on an item in the listing, the time stamp of the item will be replaced with the current time stamp that is shown above. Click the Enable item again to remove the checkmark when you are done logging, to prevent accidents.
* * Deleting Time Stamps Logs:
To delete a logged item, click the item, then click the Delete key.
To clear the whole list, click Clear-Log-List from the Log menu.
Both of those will popup a message box to confirm before doing the delete.
* * Saving the Time Stamps Log:
You can save your Log Listing at any time by clicking Save Log from the Log List menu, in the Event Window. This will popup a dialog where you can select a location. The default file name will be the Event List file name with .csv added to the end. The listing will be saved in a comma separated format that can be popped into a spreadsheet, or edited in a text editor.
* * Loading the Time Stamps Log:
To reload a previously saved Log Listing click Load Log from the Log List menu, in the Event Window. This will popup a dialog where you can select a location.
Note that, if the Log file uses the same name as the Event file, then the log file will load automatically when the Event file is loaded.
* * * * * * Tables and Charts * * * * * *
This program can draw assorted tables and charts based on the list of time stamps. Tables & Charts can be popped up by either: the Windows Menu in the Main Window, or the Charts Menu in the Event List Window. All of the table and chart options are shown below.
All three tables are arranged with the list of Events in the left column, and all of the time stamps for each event are listed horizontally to the right of the Event. This is a handy format for calculating totals and averages of times for each event.
The horizontal bar charts follow this same layout but in a graphic format.
* * Events Table with Time Stamps:
The Time Stamps Table will list the actual time stamps for each event to the right of the event name. This is the default table that will be drawn anytime this window is opened. Columns 2 & 3 will be left blank, to match the Step Times formats, explained below.
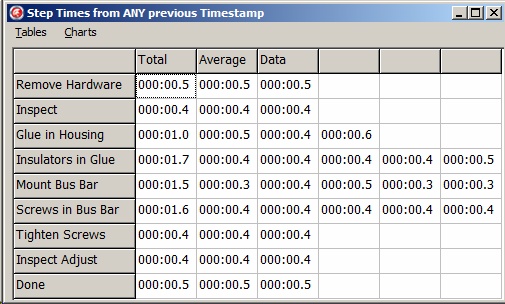
* * Events Table with Step Times 1:
The Step Times 1 Table will list the delta times for each event instead of the raw time stamps.
The delta time will be the difference from each time stamp to the most recent previous time stamp of ANY event.
This table would be used to measure step times on a process where a single person is doing all steps of the process.
Column 2 shows the sum of step times for each event.
Column 3 shows average of step times for each event.
Columns 4+ list the individual step times.
* * Events Table with Step Times 2:
The Step Times 2 Table will list the delta times for each event instead of the raw time stamps.
The delta time will be the difference from each time stamp to the most recent previous time stamp of the SAME event.
This table would be used to measure step times on a process where a different person is doing each step of the process.
Column 2 shows the sum of step times for each event.
Column 3 shows average of step times for each event.
Columns 4+ list the actual step times.
* * Saving the Tables:
You can save the three tables at any time by clicking Save Tables from the Table Menu, in the Table Window. This will popup a dialog where you can select a location. The default file name will be the Event List file name with .tab added to the end.
All three tables will be saved in a comma separated format that can be popped into a spreadsheet. This allows for additional processing or even to combine multiple log listings into bigger listings.
* * Bar Chart 1 of Events:
The three bar charts show a good representation of the time spent in each step of the process.
Bar Chart 1 will graph a horizontal bar chart of the Step Time 1 delta times for each event.
The delta time will be the difference from each time stamp to the most recent previous time stamp of ANY event.
* * Bar Chart 2 of Events:
Bar Chart 2 will graph a horizontal bar chart of the Step Time 2 delta times for each event.
The delta time will be the difference from each time stamp to the most recent previous time stamp of the SAME event.
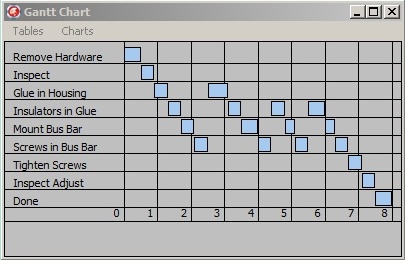
* * Gantt Chart of Events:
The Gantt Chart is essentially Bar Chart 1 stretched out so each bar starts where the previous bar ends. This displays each bar in its correct time location.